Showing posts with label hardware. Show all posts

Wednesday, February 25, 2015

How difficult is to write a solid software protection (licensing) scheme?

Extracting unique identification numbers from hardware and using them for software protection scheme


I had customers that are purchasing a single software license but using it on multiple computers so I wanted to prevent them from doing so. The solution I have found was to generate a license key that is unique for each computer.

How? Using a DLL called Hardware ID Extractor, I can read the unique hardware ID of each computer. The DLL is easy to use. To get the CPU ID for example you simply call: GetCPUID.

The first thing you will ask yourself is: does the ID persist after the user formats the PC and reinstalls Windows. The answer is YES (hooray!). It works because this neat DLL reads the ID that is written (permanently) in hardware, not from Windows registry key.
And yes, it is compatible with all programming languages.

Link: Hardware ID Extractor library


Supported IDs:

Hard disk:

* Hard drive ID (unique hardware serial number written in drive's IDE electronic chip)
* Partition ID (volume serial number)

CPU:

* CPU ID (unique hardware ID)
* CPU vendor
* CPU current running speed
* CPU theoretic speed (CPU rated speed)

Physical memory:

* Memory Load ( Total memory used in percentage (%) )
*Total Physical ( Total physical memory in bytes )
*Avail Physical ( Physical memory left in bytes )
*Total PageFile ( Total page file in bytes )
*Available PageFile( Page file left in bytes )
*Total Virtual( Total virtual memory in bytes )
*Available Virtual ( Virtual memory left in bytes )

BIOS (NEW!):

Bios unique identification numberBiosDate
Bios unique identification numberBiosVersion
Bios unique identification numberBiosProductID
Bios unique identification numberBiosVideo

Thursday, December 23, 2010

Running Win 7 on a EEE PC

I wondered if an EEEPC can run Windows 7 smoothly so after upgrading the HDD and the RAM I tried it out. Well, it does.

The first thing I had to disable was that damn Window indexing service (called Window Search under Win 7) via services.msc in order to make the computer run faster. As the computer is running from a SSD disk the next thing to disable was the scheduled defrag tasks. 

The Windows Experience Index rating is:
  • CPU - 2.3
  • RAM -  4.5
  • Video card -3
  • Drive - 6.8

With FRESH WINDOWS the
  • CPU loading while idle is: 1%
  • Memory utilization (immediately after Win start up): 450MB
  • Boot time: 10 sec

I also disconnected the battery while using the laptop on AC in order to prevent its unnecessary aging.


Upgrading EEEPC 1000 to 2GB RAM, 250 GB SSD and Win 7

I just upgraded  my EEE PC 1000HE to 2GB of RAM (800MHz). It also received a 250GB SSD A-DATA hard drive. The last touch was a brand new and shiny Windows 7 32 bits. Here is how to install Win 7 without a DVD-Rom unit.

How to install Windows 7 - Step by step graphical guide

Place the DVD/Flash stick Into Your Computer & Restart The Computer. Make Sure Your Bios Boot Settings Are Set To Boot From DVD ROM Drive or Flash stick. Once you boot from your DVD you will see this screen:


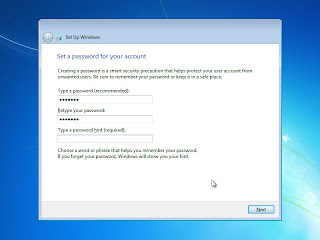
At this point the Win 7 Setup is running. It will guide you through the process:


Done

Install Windows 7 without a DVD (easy way)

1. Download and install "Windows 7 USB/DVD Download Tool" from Microsoft's web site.  The program has only 2MB. 
Hint: instead of the above mentioned tool you can also use this one.

2.  Get the Windows 7 ISO file

3. Start "Windows 7 USB/DVD Download Tool". It will ask you where is the ISO file. Show it and let it write it on your USB stick. The stick needs to be at least 2.5 GB. All files on it will be deleted. It will take about 3-5 minutes to copy the ISO file on your stick. When done, just take the stick and put it in the computer where Win7 needs to be installed..

4. Boot from your USB stick and start installing Win7. 
Hint: To boot from your USB Flash, usually you need to restart the computer and press the Escape, Delete, Home or F2 (F2 works with Assus EEEPC) key immediately after restart. If it doesn't work, do a Google search to see how you can change boot order for your computer (brand). 

5. Install Windows 7 

-------------------------


There are other ways to write the Win 7 ISO to a stick without using "Windows 7 USB/DVD Download Tool" tool, but it is more complicated: 
http://www.intowindows.com/how-to-install-windows-7vista-from-usb-drive-detailed-100-working-guide/
http://www.blogsdna.com/2016/how-to-install-windows-7-from-usb-drive-without-windows-7-iso-dvd.htm


Sunday, December 19, 2010

Memory management under Window OS

The 4GB limit

In the default Windows configuration, 2 GB of this virtual address space is designated for private use of every process, and the other 2 GB is shared between all processes and the operating system. Typically, applications such as Notepad, Microsoft Office Word, and Adobe Acrobat Reader use only a fraction of the 2 GB of private address space. 

The only way to increase the size of the virtual address space for a process beyond 4 GB is to use 64 bit hardware with a 64 bit version of the operating system and application built for the 64 bit instruction set.
The nub of it is, that no matter how much physical RAM is in the computer, the amount of memory available in the process’ private part of the virtual address space in 32 bit Windows implementations is limited to:

  • 2 GB - without the /3GB switch - this is the normal, default maximum private virtual address space
or
or
  • any physical RAM not used by the OS and other applications by designing the application to use the AWE (Address Windowing Extensions) API. 


How to enable the 3GB support in an application:

“No APIs are required to support application memory tuning. However, it would be ineffective to automatically provide every application with a 3-GB address space. Executables that can use the 3-GB address space are required to have the bit IMAGE_FILE_LARGE_ADDRESS_AWARE set in their image header. If you are the developer of the executable, you can specify a linker flag (/LARGEADDRESSAWARE).
To set this bit, you must use Microsoft Visual Studio Version 6.0 or later and the Editbin.exe utility, which has the ability to modify the image header (/LARGEADDRESSAWARE) flag. For more information on setting this flag, see the Microsoft Visual Studio documentation.”


Memory, Committed Bytes:

This is a measure of the demand for virtual memory. It shows how many bytes have been allocated by processes and to which the operating system has committed a RAM page frame or a page slot in the pagefile (or both).


Process, Working Set, _Total:

The amount of virtual memory in "active" use. It shows how much RAM is required so that the actively used virtual memory for all processes is in RAM.


Paging File, %pagefile in use:

How much of the pagefile is actually being used. This is the counter you should use to determine whether the pagefile is an appropriate size. If this counter reaches 100, the pagefile is completely full and operations stop working. Set the pagefile large enough so that no more than 50 to 75 percent of it is used. If a large part of the pagefile is in use, having more than one pagefile on different physical disks may improve performance. 


Memory, Pages Output/Sec:

This shows how many virtual memory pages were written to the pagefile to free RAM page frames for other purposes each second. This is the best counter to monitor if you suspect that paging is your performance bottleneck. Even if the Committed Bytes value is greater than the installed RAM, a Pages Output/sec value that is low or zero most of the time indicates that there is not a significant performance problem that is caused by not enough RAM.